Method of assembling and disassembling universal joint
Points to Note
- It is not possible to disassemble type S, D, K, KD, M, MS and MM. When it is machined, be careful not to give a shock to parts.
- Make sure not to hit or give a shock to parts unless assembling procedure requires it.
- Lubricate moving parts sufficiently after completion of assembly.
- When disassembled parts are needed, place an order of type Q that designates the specification of “can be disassembled”.
- After completion of machining a shaft-hole etc.you can send these parts back to Miyoshi for assembling. Necessary expenses are to be billed.
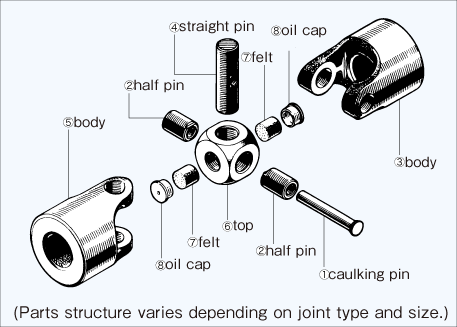
For type B, BD, H, HS, HSD, HSS and BR of size range from 6 to 25

Follow the following procedure for disassembling and assembling.
Disassembling procedure
- Pull out a caulking pin (1). (Remove caulked area around the center of a caulking pin by drilling. The caulking pin cannot be reused.)
- Pull out a half pin (2). (If it is hard to do so due to tight fit between a pin and a pin hole, hit around the pin hole lightly with a copper hammer so that the pin may come out.)
- A body (3) can be removed. (In case that some machining is carried out on the body③, you can skip the following procedure. )
- Pull out a straight pin (4).
- A body (5) can be removed.
- Be careful for a felt piece not to drop from a top (6) and be lost.
Assembling procedure
- Insert the top (6) in the body (5).
- Assemble the straight pin (4). (Make sure that the top moves smoothly and the position of the half pin follows the illustration.)
- Assemble the body (3).
- Assemble the half pin (2). (Make sure that the cutout of the half pin, which is prepared to prevent turning, fits to the seat of the straight pin as shown in the illustration.)
- Assemble the caulking pin (1).
- Confirm that the assembly moves rightly.
- Caulk the caulking pin. (While caulking, watch the position of the half pin and confirm that the assembly moves rightly.)
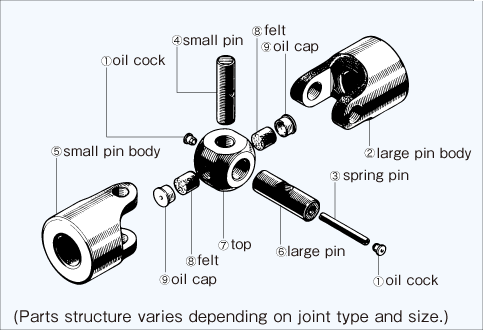
For type B, BD, BS and BSD of size range from 30 to 60

Follow the following procedure for disassembling and assembling.
Disassembling procedure
- Remove an oil cock (1).
- Grip a body (2) in a vise or a V-block and hammer a spring pin (3) out.
- Pull out a small pin (4).
- A body (5) can be removed. (In case that some machining is carried out only on the body (5), you can skip the following procedure. )
-
Pull out a large pin (6).
-
The body (2) can be removed.
Assembling procedure
- Insert the top (7) in the large pin body (2).
- Assemble the large pin (6). (Make sure that the top moves smoothly and the hole position of the small pin follows the illustration.)
- Assemble the small pin body (5) and the small pin (4).
- Confirm if the spring pin (3) can be inserted using a thin stick, then hammer it in. (If the holes of the large pin and the small pin are not aligned rightly, you cannot insert the spring pin.)
- Hammer the oil cock (1) in.

