


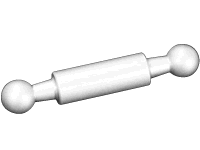
BC859
L is longer than BC858. The angle of the object is easily adjustable.
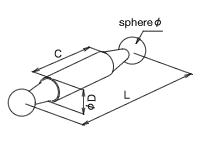
| Part No. | Color | ballφ | φD | L | C | |
|---|---|---|---|---|---|---|
| BC06- | 859 | W/B | φ6 | φ6 | 30 | 15 |
| BC10- | φ10 | φ10 | 50 | 27 | ||
| BC13- | φ13 | φ13 | 65 | 36 | ||
| BC16- | φ16 | φ16 | 75 | 40 | ||
| BC20- | φ20 | φ20 | 95 | 50 | ||
※You may download 3D CAD drawings by clicking on the part number of interest.
How to assemble
Joint-ball
Joint-ball
Steel plate, steel screw and spring are enclosed, if you purchase Joint-base.
Note
This will not be recovered if the slit part is expanded too much. Please make sure on your work.
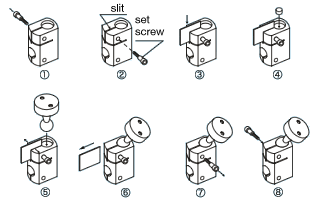
- First of all, remove cap screw on slit side
- Screw the set screw from the opposite side. Please make sure the top of screw is not appeared within slit.
- As indicated on the above figure,insert and position steel plate(less than 0.9mm) and tighten lightly the cap screw with your other hand.
- Drop the attached spring into the center of the hole.
- Tighten the aforesaid cap screw by hexagon wrench so that slit part is opening. Push into joint-ball suitably orif not going through, tighten the cap screw a little and push again and repeatedly.
- If joint-ball is inserted, loosen the cap screw and remove the steel plate.
- Check if joint-ball can move smoothly and remove the cap screw afterward.
- Screw the cap screw (1.) into the original position (the opposite side) and finish.
We can assemble on behalf of you, if required